How to Make and Manage Your Business’s Google+ Local Page
 Google recently launched Google+ Local Pages as a way of encouraging businesses, organizations, products, and brands to have a presence on the new Google+ social network. The new business profile format helps companies promote further awareness of their business, while enabling Google+ users to discover and share information about the business. This can result in greater exposure while increasing a company’s marketing potential.
Aside from using the social media network, users can access Google+ Local Pages through Google search as well as Google Maps (which is usually done through localized searches similar to Google Places.) Google+ Pages are more dynamic, user-friendly, and easier to use than the traditional Google Places pages. Additionally, Google+ Local Pages have many similarities compared to Facebook brand pages, which further emphasizes the social integration of these pages.
Google+ Local Pages for businesses are like a hybrid of Google Places but with more social interaction. As individual user (not a business,) you view who in your Circles has experienced a particular business based any reviews that were given. These postings will also show up in related search engine results, we can further impact the SEO and website optimization potential of these page. In fact, Google+ Local Pages are already appearing in search engine results pages (SERPs). As more people make their way to the Google+ social network, the influence on SEO will be even greater.
So, how do you go about creating and managing a Google+ Local Page? Follow the step-by-step instructions below to learn how.
Creating a Google+ Page
 1. Create a Google profile if you do not already have one.
2. Log into Google+ using your profile credentials
3. On the left, go to ‘More’ and click on ‘Pages’
4. On the upper right, click on the ‘Create a new page’ button
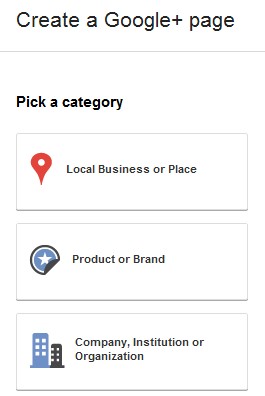
5. Choose the Local Business or Place category, which is one 1 of the 5 categories (the others being Product/Brand, Company/Institution/Organization, Arts/Entertainment/Sports, and Other)
6. Type in your business phone number (not any other number) and then click on ‘Locate’. Insist on a phone number that starts with + then your country code since Google is very picky when it comes to business phone numbers. The phone number is to be separated by dashes for easy viewing.
7. If your business is listed, click on it and edit if you wish. If the name of your business does not appear, click on the ‘Add your business to Google’ button. You could also look up a different business name and try again.
8. Enter/edit basic info about your business, including the business name, the business phone number, and your address. If Google has this information from elsewhere, you will be asked to confirm the details.
9. Go to the category box and select the category that best describes your business so that users can better understand what your business is all about.
10. Select the age requirement should you wish to change the default age requirement. You also get to indicate if it is alcohol-related.
11. Click on the ‘Create’ button.
12. You will be taken to a new page where you can add a profile photo for the Google+ Page and a 10-word tag line describing the page. Note that it is possible to write more than the 10 words, but not everything will be shown when a potential customer/client views your profile if it is longer than 10 words.
13. Click on the ‘Save’ button
Posting on your Google+ Page
After creating a Google+ page, you will get a notification from Google indicating that you are now live on Google+. You can then start adding page content, including videos and photos, as well as performing other Google+ optimization tasks for your local marketing efforts. Whenever you wish to post something, click on the ‘Share’ button in the top right area of the page. Whatever you share will be visible to whomever is following your business. You can enter the URL of a YouTube video, the link to an article or website, or simply make a comment. Just be sure that whatever it is that you share, it suits the interests of you target audience.
Managing a Google+ Local Page
You can create and manage multiple Google+ Pages, depending on the nature of you brand of business. This is particularly important if you have several store branches, or a wide line of brands that you want to promote. Like other social media platforms, you can even create pages for particular events. The trick to managing a Google+ Page is to ensure the information that you share as well as post is highly relevant to you company and its target market.

Note that all features of Google+ Pages are not yet in place. The platform is still relatively new, so it may be a matter a time before we start seeing the social network take off. In the mean time, we suggest you keep you Google+ presence fresh with consistent posts and ongoing interaction.
This article written by Tyler Tafelsky, one of our SEO & Website Optimization Specialists here at Web Presence Group, and writer for Epic Entrepreneur and other business-related blogs.
Visit Tyler on Google+


